Food
Cast iron waffle maker
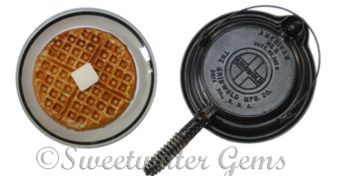
Cast iron waffle maker
I got my first cast iron waffle maker as a gift from my mother
about 20 years ago. I loved it so much that now I have 3 of them. (For a while we had 4, but we gave one to friends for Christmas.) I use all of mine regularly and make waffles at least once a week.
Cast iron Waffle irons heat over a gas or wood fire, so they are great for camping or any time electricity isn't available.
The only major disadvantage to using a cast iron waffle maker is the relative lack of information about HOW to use them, which makes for a rather steep learning curve and a bit of wasted waffle batter. I have attempted to fill that need here. :-)
When we gave our friends a waffle maker for Christmas I also typed up an "instruction manual" for them based on my experience with our Griswold and Wagner irons. Most of that document is iincluded below:
Waffle history:
Although the Ancient Greeks cooked flat cakes similar to the waffle, the earliest waffle iron probably originated in Holland or Germany around the 1300s.
These waffle irons were constructed of two hinged iron plates connected to two long, wooden handles. The plates were often made to imprint elaborate patterns on the waffle, including coat of arms, landscapes, or religious symbols. The waffles would be baked over the hearth fire.
Dutch pilgrims brought waffle irons to America in the 1620s.
In 1869, Cornelius Swarthout patented the first U.S. waffle iron. This iron sat atop wood or gas stoves. The cast iron plates were joined by a hinge that swiveled in a cast iron collar.
In 1911, General Electric produced its first electric waffle iron, with the help of Thomas J. Steckbeck. Steckbeck is credited with designing the first-of-its-kind heating elements that used a built in thermostat to prevent overheating, a common problem with early versions. With his revolutionary design and General Electric funding, the first fully electric waffle iron rolled off the assembly line July 26, 1911.
Waffle House opened its first store in suburban Atlanta in 1955.
HOW TO USE YOUR CAST IRON WAFFLE MAKER
(These instructions work for all of our irons... A WagnerWare #8, A Griswold #8, and a Griswold Heart & Star.)
Heating the iron:
Make sure that the iron is clean and not particularly oily. Any excess oil during the heating phase may turn gummy and make the iron hard to clean. The iron should by "dry" during heating and only be oiled immediately before you are ready to pour the batter in.
Start heating the iron about 10-12 minutes before you want to pour the first waffle.
Both sides of waffle iron should be preheated to approximately 425 degrees. The iron should be flipped a couple of times while preheating to insure even heating of both sides.
When hot the iron should smoke just a little when first opened. If it smokes a lot it’s probably too hot. If it doesn’t smoke at all it’s probably not hot enough yet.
I use an infrared "point and shoot" thermometer to check the temperature. It's great for checking the temp of cast iron, hot oil, etc .It’s a very handy kitchen tool. Radio Shack, $50...
The iron should take aprox 8-10 minutes to heat both sides to 425 degrees.
If it takes substantially more or less time to heat, fire temp is likely too low or too high for optimum results.
Making the batter:
I love Krusteaz Buttermilk Pancake Mix. It's tasty, fast, easy, and only requires the addition of water, which makes it a no-brainer. I highly recommend starting with Krusteaz and using it at least a few times to get the feel of your waffle iron.
For each waffle you will need about 1/2 cup of Krusteaz, plus enough water to give it the right consistency, and a small dollop of vegetable oil. One half cup (maybe a tablespoon more) of Krusteaz, mixed with the right amount of water should make exactly the right amount of batter to perfectly fill the iron.
The recipe on the Krusteaz box calls for 2 cups of Krusteaz and 1-1/2 cups of water which is enough for 4 waffles. Divide the recipe accordingly for 1 or 2 waffles.
I never bother to measure the water anymore, I just add water until it's the right consistency. The batter should pour easily, but not be too runny. Practice...
Pouring the batter:
When the iron is hot, open it and spray a short burst of PAM or other vegetable oil spray onto one half of the iron, close and flip iron. Reopen and spray the other half. You want the least amount of oil that will just barely coat the entire surface. About a 1 second burst from 12" away is usually plenty.
Once the iron is oiled, immediately pour the batter in and close the iron.
Always try and use enough batter to make a complete waffle that fills the entire iron without spewing too much batter over the side. In areas that don't get filled with batter, the oil has a tendency to pool and get gummy, which can eventually cause cleaning problems. Once in a while is no big deal, but try and avoid under-filling if possible. It is not advisable to try and make a "partial" waffle. Always make a whole waffle and give any leftovers to the dogs
Cooking:
Once the batter is in and the iron is closed, cook for approximately 60-70 seconds on the first side. Flip iron over and cook for 120-140 seconds on the second side.
Cooking time can be adjusted for the amount of "crispiness" desired. These times are only a starting point. Adjust to suit your taste. When done, open iron and use a fork to lift the waffle out.
Eating:
This is the best part! Spread waffle with butter, syrup, jam, peanut butter, sausage gray, anchovies... whatever you want. (probably not all at once though) EAT and Enjoy!
Cleaning the iron:
The iron should be cleaned as soon as possible (after eating!) while it is still warm. Once the iron has cooled completely it will be harder to clean. When warm it should be very easy.
Simply wipe the warm iron inside and out with a dry paper towel, being careful to remove any waffle debris and excess oil. There should be no puddles of oil left. Any stubborn bits that cling to the iron can be removed with a damp scrubber sponge. it shouldn't be necessary to “wash” the iron in water. If it does become necessary avoid soaking the iron in water for more than a few minutes. Always dry thoroughly before putting away.
Storage:
Store iron in a dry place. Moisture is its worst enemy, keep it clean and dry! The best way to keep cast iron well seasoned and in good shape is to use it often. Make a waffle at least once a month and you will always have a well seasoned iron in "ready to go" condition.