Sophia gets her Subcutaneous (sub-Q) Fluids
February, 2008. - It's been
4 years since Sophia was diagnosed with CRF. We lost Sophia in June 2005
to a combination of heart disease and kidney failure, 14 months after
she was diagnosed with CRF. (People still write and ask occasionally.)
Although her body is no longer with us her spirit lives on and she will
always be remembered as one of the best friends I've ever had. In the
end we lost the battle, but we put up a great fight and gained a lot of
*high quality* time with Soph that we certainly would not have had without
subQ fluids, a decent vet, and the helpful advise of the good folks at
Feline_CRF_support.
Educate yourself about CRF, find a vet that you can work with and that
isn't afraid to have you ask questions and make suggestions, don't be
afraid of subQ's if they are needed, and give your cat *lots* of love.
-----
IMPORTANT
DISCLAIMER:
None of the information in this document is intended to be construed as
"medical advice".
We are NOT veterinarians, or doctors, or medical experts of any sort. We have NO medical diplomas on our walls. We are just simple folks who love our cat and have been successfully treating her for CRF with oral medication and subcutaneous fluids for several months WITH the knowledge, advice, and consent of a qualified veterinarian. It is not our intention to tell you what medications or fluids (if any) you should be giving your cat. Consult a qualified veterinarian before trying any methods described here. Your Veterinarians instructions always supersede this information.
We also make no claims that our methods are the best way. There are many ways to get a job done, and this is simply the way we have learned to do it. It has worked very well for us, but there are no guarantees that it will work for you and your cat. You and your Vet will need to find the methods that are comfortable and safe for you and your cat. Our intent here is mostly to show that it CAN be done, and that it needn't be scary once you and your cat get used to it.
PART
ONE: OUR STORY.
In mid-February of 2004 our sweet, fuzzy cat Sophia was diagnosed with
CRF (Chronic Renal Failure).
The Vet said she'd probably had it for quite a while, but we were oblivious until her big "crash" in February. We knew she'd lost some weight, but didn't really realize how much until she was on the scales at the Vet. She'd been drinking a lot of water for quite a while but it just seemed "cute" to find the cat standing in the bathtub drinking the drips from the faucet. I noticed that the cat box got waterlogged pretty fast and needed frequent changing, but just put it down to it being winter and the cats all peeing inside instead of outdoors like they do in the summer. In a multi-cat household it's hard to keep track of who's eating and how much. In retrospect, the symptoms were probably there for a couple months before her big crash in February.
I feel awful for not recognizing the symptoms sooner and getting help for her earlier, but I was ignorant to what it all meant until February. I still feel guilty about it, but there's no point in dwelling on my stupidity. It doesn't do me any good, and it doesn't help Sophia either.... (but there are many other things I CAN do to help her)
In mid-February she stopped eating. She completely lost interest in food, became totally lethargic, and STANK like crazy. She really smelled awful - her breath - her fur - it all stank. I finally caught on to the fact that there was a real problem and off to the Vet she went.
It was not a happy time at the Vet. Our sweet girl was extremely sick. The Vet explained that she had Chronic Renal Failure and that most of her kidney function was gone. Sophia spent several days at the Vets getting IV fluids to help flush the toxins out of her body. Our Vet was not optimistic. "IF Sophia is able to go home," she said, "she might have a few weeks or a few months to live... it's hard to say... "
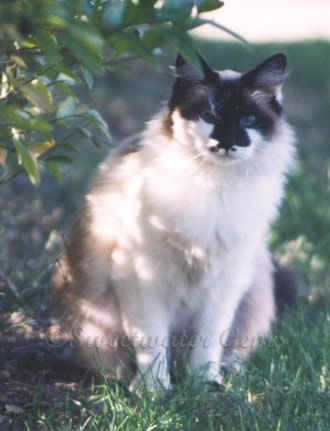
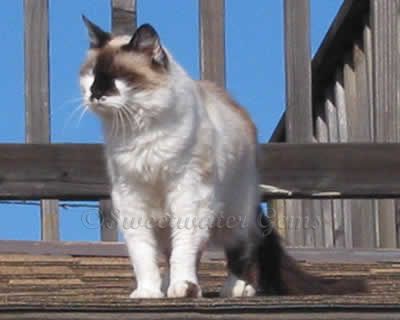
I was devastated. Sophia had been my faithful friend and companion for nearly 14 years. I've had a few cats over the years, but never one like Sophia. She's a very special girl in a lot of ways, and she means a LOT to me. She's not "just a cat". She's the best of family. I'll just leave it at that.
So
of course the first question for the Vet was "is there anything we
can do..?"
"Well... yes... " she answered, " there are some things
that sometimes help, but.... "
So our Vet showed us how to do sub-Q fluids and prescribed some meds for us to give her. I couldn't imagine trying to give a cat a bunch of oral medications and putting a needle into her on a regular basis. But neither could I just let her die without at least giving it a try.
In that first week or so of tears and unhappiness following Sophia's diagnosis, I was fortunate to find some EXTREMELY good resources for cats and their humans who are dealing with Feline CRF.
I
HIGHLY recommend these web sites for good information on Feline CRF:
http://www.felinecrf.org/index.htm
http://www.felinecrf.com
And
you can find a fabulous support group with thousands of people who are
treating their cats for CRF and have an incredible amount of good advice
and moral support to offer:
http://groups.yahoo.com/group/Feline-CRF-Support/
If you are here because YOUR cat has been recently diagnosed with CRF than you have our condolences. It's not easy finding out a loved one has a terminal disease. But with a good treatment plan, a lot of love, and a good fat dose of luck, many cats DO live a good life for many months or even years after diagnosis.
I strongly recommend you spend some time educating yourself at the above sites. Every cat is different, and some respond much better to treatment than others, but there are MANY things that can be done to help a CRF cat feel better and live a good quality life, and you can learn much about it at those websites. The good folks at the Feline-CRF-Support group have been invaluable in providing very good technical information along with excellent emotional support that has helped us greatly in our quest to keep Sophia feeling good. We are also fortunate enough to have a good Veterinary clinic where the doctors are fairly familiar with CRF and are willing to work with us in providing good long-term care.
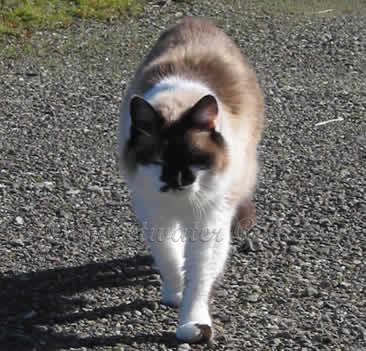
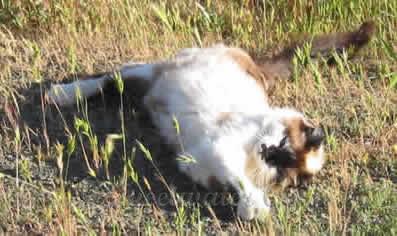
So. Here we are 9 months later. Sophia is still with us. She's active and loving and playful and purrs and goes outside to romp around at least once a day. She loves a lap to lay on or to find a hand to pet her. Her appetite is fairly good and her weight is back up from under 6 lbs when she crashed to well over 8 lbs at this time. Her Creatinine has been fairly stable for several months at around 4.2 and her BUN around 50-60.
Sophia's quite obviously still having a good time being here in spite of the 5 different oral meds she needs to take every morning and the needle jab and fluids AND 3 more oral meds every evening. She gets a pretty full assortment of medications... Famotidine to help alleviate excess stomach acid, iron and vitamin B supplements, Amlodopine for high blood pressure, Lactulose to alleviate the chronic constipation that often comes with CRF, Calcitriol to help keep parathyroid hormone levels under control, meds to help control Metabolic Acidosis, and most importantly... Subcutaneous (sub-Q) fluids to help keep her hydrated.
One of the big problems for cats with CRF is that the kidneys no longer concentrate the urine and don't conserve water correctly. The cats must urinate copiously and frequently to keep the toxins flushed out and must drink a large amount of water to make up for this large water loss. At some point they can not or will not drink enough water to keep up with the demand. They become dehydrated and toxins and waste products build up in the blood, which further damages the kidneys and other organs. It's a bad situation....
Subcutaneous fluids help rehydrate the body and keep the toxin levels down. They also replenish some of the electrolytes that are lost in the urine and not replenished by just drinking plain water.
Just as the name implies, subcutaneous fluids go under the skin... and are administered by sticking a needle into your cat and letting a given amount of special fluid flow under the skin to help keep her sufficiently hydrated.
All these meds may sound like a lot to inflict on a cat, but we (including Sophia) have found it to not be a very big deal at all. I think it's more of a strain on me than on Sophia. With practice, we have gotten very good at giving the oral meds and the sub-Q fluids, and it takes less than 10 minutes (closer to 5) out of Sophias day to get ALL of her daily meds including the sub-Q fluids. That leaves her with 1430+ minutes every day to enjoy being a cat. And she still very much enjoys being a cat! :-)
We are extremely fortunate, because Sophia is very easy going with her meds. She was difficult at first, but with time she and I have both gotten better at it, and neither one of us is afraid of it anymore. She knows it will just take a minute or two and then it will be over. She's a very smart, very good girl and accepts it with little fuss - we just do what we need to do. It's no wonder we love her so much.

So, finally after all those words, I will get to the real point of this document... which is to show how WE give Sophia her sub-Q fluids.
We are not experts, but we have done it successfully over 200 times now so we are not really "newbies" anymore either...
PART TWO: ADMINISTERING THE FLUIDS.
Of all the meds that we need to give Sophia, the hardest one to deal with
at first was the sub-Q fluids. It's not that it's a technically difficult
thing. It's pretty easy to learn how. The problem is that it's an emotionally
difficult thing. If you are like we were, you're probably still in shock
from finding out that your best furry friend is so ill, and now you are
expected to stick a needle in him or her on a regular basis (possibly
daily) to give fluids. It's a hard thing to accept at first, and there's
lots of tears involved and a lot of fear about doing it correctly (or
even being able to do it at all). Our Vet showed us how to do it, and
made me do it once in the office before turning us loose with our bag
of fluid. But I found that it's not quite the same doing it at home as
it is at the Vets office - at the Vets office, the cat was GOOD (or just
too sick to care). She just laid there quietly while the Vet stuck her
the first time and gave a small amount of fluid, and she just laid there
quietly when the Vet gave ME the needle and I stuck her and finished giving
the fluids. It seemed pretty easy while we were there and under close
"adult" supervision.
But at home it was different. There was no "professional" there to watch over and instruct us and I was extremely nervous. Sophia was freaky. It was all new to her too, and she could certainly sense that I was upset and not fully in control. She was ready to bolt long before the needle touched her. When I stuck her with the needle she let out a yell and growled and struggled and quite clearly did NOT want to be there. I felt horrible for what I was doing to her, and the tears rolled off my face while we did the deed. All I could think about was what a horrible thing this was to do to my cat. Sophia hated it and I hated it. It was AWFUL.
But... after a few times it got MUCH better. We learned ways to make it less uncomfortable for Sophia, and *I* finally realized that what I was doing was NOT an awful thing to do TO her - It was a loving thing that I did FOR her each day. Sure the needle prick is uncomfortable for a brief bit, but the effects of the fluids are good and make her feel better for the rest of the day. If you've ever been dehydrated you know what a nasty thing it is. It makes you feel really horrible. Giving the fluids makes your cat feel BETTER. It's as simple as that.
ATTITUDE
And that brings me to the first thing that I think is very important about
giving sub-Q to a cat... ATTITUDE.
Cats are very intelligent and perceptive creatures. There's no doubt that they are able to "read" our emotions and feelings.
If you go into the sub-Q session full of fear and dread and thinking "how awful it is to do this", your cat will almost certainly pick up on those bad vibes and will be as tense and nervous and freaky as you are. Try and relax and think about how much better your cat will feel being properly hydrated, and how much you love your cat and how good it is that you are able to do this loving thing FOR her. It's like buying a nice refreshing beverage for a very thirsty friend. It's a GOOD thing. If you go into the sub-Q session with a relaxed, confident, loving attitude, your cat will pick up on this and will likely be much more relaxed and confident also.
I know it's hard at first. Sticking needles in our friends isn't something that most of us feel comfortable with. But it NEEDS to be done and your cat will feel better for it in the long run. Feel good about what you have to do. It's an act of love and if YOU don't do it for him or her who will?
THE
PLACE
The next important thing is the setting. You need a place where you and
your cat will be comfortable and undistracted for the several minutes
it will take to give the sub-Q fluids. The location you choose should
have a place where you can hang the fluid bag and get at least 3 to 4
feet (or more) of vertical distance from the bottom of the bag to the
cat. The higher the bag is above the cat, the faster the fluid will flow
and the less time it will take. If the fluid flows TOO fast (which may
be uncomfortable to some cats) you can always use a smaller needle which
will slow down the flow and also makes a smaller hole in the cat (which
means less discomfort and less scar tissue). Lots of vertical height on
the bag is a good thing.
You and your cat may have to experiment a bit and find out what the best place is. Some people sit in a closet and hang the bag on the closet rod. Some use the bathroom and hang the bag on the shower rod. It has to be comfortable for both of you. We have fairly high ceilings upstairs, so I put a hook in the ceiling and hung a chain from it. The bag hangs from the chain at a comfortable height above a small table with a towel on it. I kneel on the floor, which puts my arms at just the right height to rest them on the table and hold Sophia. This is our spot, with the bag hanging over it..
RESTRAINT
I think it's best, if possible, to try and make the cat "want"
to receive sub-Q's so that the absolute minimum restraint needs to be
used while doing the job. Some people give a favorite food treat for the
cat to snack on during sub-Q, which helps keep the cat distracted from
the real business at hand and gives a nice reward for being so good. Lots
of loving attention and a tasty treat during or immediately after help
make the cat realize, "hey, this isn't such a bad deal after all".
Some folks put the cat in a small box with an open top, which may make
the cat feel kind of like it's "hiding" and safe and also helps
keep the cat from getting away so easily. Hopefully your cat will respond
well and be as cooperative as Sophia. We really don't need any restraint
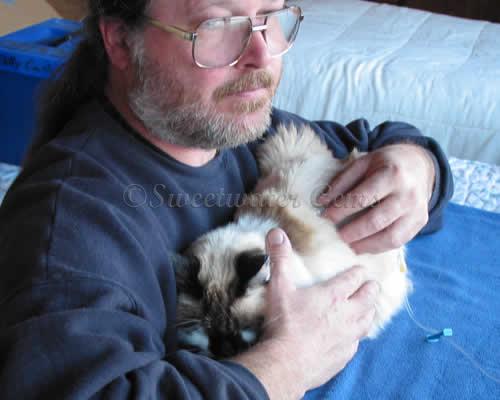
at this point. I just put Sophia on the table, kneel on the floor so that
my chest and arms are at the same height as Soph, and I just gently wrap
my arms around her to keep her from wandering off.
Of course, not all cats are the same, some will simply refuse to cooperate and will need more serious physical restraint. One of the techniques that seems to be popular in this case is to wrap the cat in a towel (think kitty burrito) with just enough cat exposed to administer the fluids. We are fortunate to not need such techniques with Sophia so I can't offer much advice on how to restrain your cat if necessary. If you join the Feline_CRF_Support group and ask around, you will almost certainly get a lot of very good advice.
THE EQUIPMENT...
The
Fluid Bag.
There are several types of fluids that your Vet may prescribe for you
to give as sub-Q fluid. What type of fluid to give and how much depends
on your cats condition and is up to your Veterinarian. You should never
change the type or amount of fluids given without the knowledge and consent
of your Vet.
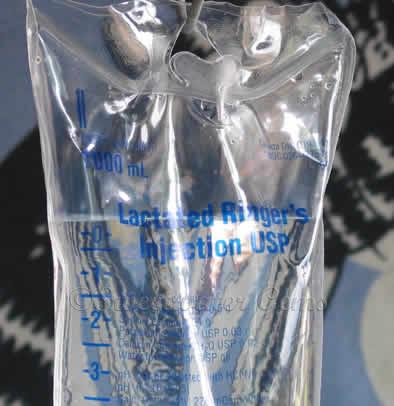
One of the most common fluids is Lactated Ringers Solution. Regardless of fluid type, it is most likely to come in a 1 Liter plastic bag, similar to the one shown below:
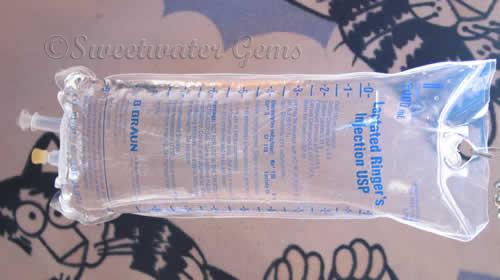
It is not necessary to refrigerate the Lactated Ringers. Simply store it in a clean place at room temperature. Here's what the side of the Lactated Ringers box has to say about it:

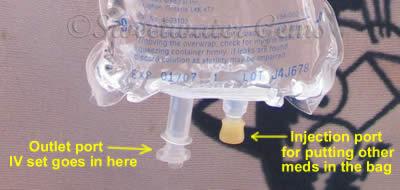
Many fluid bags will have 2 ports at the bottom. One of the ports is the outlet where you will insert the IV set, and the other port is usually for injecting other medications into the bag if necessary.
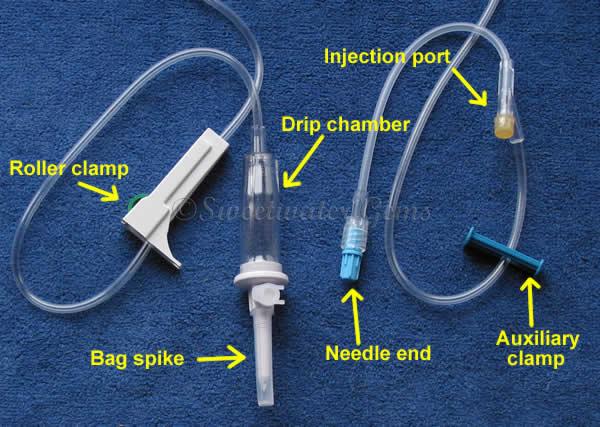
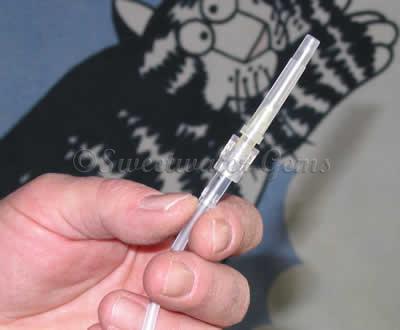
The
IV set.
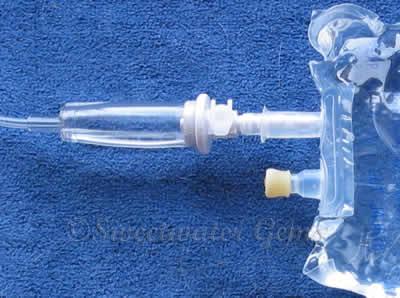
The IV set is pretty simple. One end has a spike that inserts into the
outlet port on the fluid bag, and a "drip chamber" so you can
see how fast the fluid is going .
The other end accepts the needle. There is also an adjustable roller clamp that fits over the tubing, with a thumbwheel that lets you turn the flow on and off and adjust the speed of the flow if it is too fast. Many IV sets also have a second clamp which is just a flat piece of plastic with a slot in it. You can use this little clamp to temporarily pinch off the IV tubing so you can loosen the thumbwheel clamp and slide it up or down the tubing to a comfortable location without losing any fluid.
IV sets come in different lengths, but it doesn't really matter too much as long as it's long enough to comfortably reach from the bag to the cat with a little to spare. Some IV sets also have a port on them near the needle end to inject medication into the line while the fluid is running into the cat. If you aren't injecting meds into the fluid then you don't need an IV set with an injection port, but it doesn't hurt anything if you have one anyway. IV sets come in a few different lengths, but we have found the 72 inch one to work nicely for us.
The
needles.
One of the most important things in minimizing the discomfort of the sub-Q
process is to use good quality needles in the smallest size you can comfortably
get away with. Smaller needles make a smaller hole in the cat and hurt
less on insertion, but the fluid also flows slower through them and so
it takes longer to get a given amount of fluid into the cat. It's something
of a trade off. If your cat is real patient and will sit still easily
during sub-Q, then a small needle is good. If your cat gets impatient after
the fluid has been going in awhile, then maybe a larger needle that flows
faster is better for you. With 20 gauge Terumo Ultra Thin Wall needles
it takes us about 2 minutes to get 100 mL of fluid into Sophia.
When we first started giving Sophia her sub-Q fluids, we were using the needles our Vet gave us. They were *16 gauge* Monoject needles and they were about the size of something you might use to give shots to an elephant, or harpoon a whale with. When I stuck Sophia with them they were hard to push in, and when they went in Sophia would let out a yell, and growl and struggle. They were not nice needles. I asked the Vet for some smaller ones, and got some 18 gauge Monojects from them instead (larger numbers mean smaller needles). The 18 gauge needles were a little better, but they were still kitty harpoons and Sophia wasn't very happy with them. Finally, on the advice of the Feline_CRF_Support group, I bought a box of Terumo 20 gauge Ultra Thin Wall needles. WOW! What a difference! The 20 gauge Terumos are so incredibly sharp that they just slip right through cat skin like it was soft butter, and Sophia hardly even notices. The 20 gauge needle is much smaller than the 18 gauge but the thin wall design of the Terumo's makes them flow almost as fast as an 18 gauge Monoject. Terumo needles are great and we HIGHLY recommend them for anyone who has to give sub-Q fluids. Your kitty will appreciate it!
Needles are cheap (about $6 for 100) and you should always use a new needle for every session to be sure it's sterile and sharp.
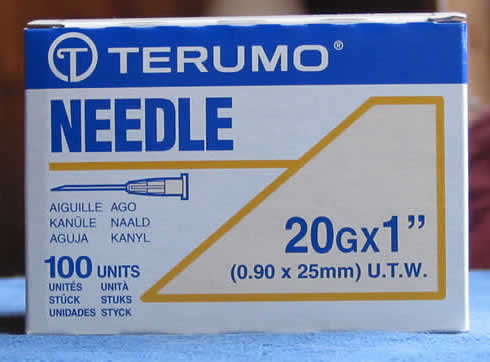
If you try and get Terumo needles at your local pharmacy, sometimes it's helpful to have the stock number or UPC code off of the box.
Assembling the hardware.
So... I've got a bag of fluids, a place to hang it, an IV set, some nice
pointy needles, and a cat....
The first thing to do is assemble the hardware. Start by removing the bag of fluids from its protective plastic wrapper. Grab the fluid bag in the middle and give it a gentle squeeze for a few seconds to check for leaks. There should not be any. Examine the contents of the bag. It should be clear, with no cloudiness to it. If the fluid is at all cloudy, or has anything floating in it, or had any leaks when you squeezed it, than it is likely contaminated and should be discarded. If the bag looks ok, then set it down for a minute and open the IV set wrapper. Remove the IV set and stretch it out. Slide the plastic thumbwheel assembly up or down the tubing until it will be in easy reach when the bag is hanging. I like the thumbwheel to be about 2 feet from the needle end of the hose. Now CLOSE the thumbwheel so that it clamps the tubing shut. If you forget to close the thumbwheel valve, then when you "spike the bag" fluid will run out the end of the tubing and dribble onto your shoes. You may also lose the air that's in the bag, and that will make the fluid level impossible to read later Trust me.... Close the valve BEFORE spiking the bag.
The valve is closed, right? Good. Now you can "spike the bag". Set the IV set down for a second and pick up the bag. Look at the outlet port on the bottom. There should be a plastic cap that covers it and seals it from contamination.
Grab the tab on the cap and pull it loose. This will reveal the opening where you will put the "spike" end of the IV set. Once the cap is removed be careful not to touch the open end of the port with your fingers or let the end touch the table or anything else. It's sterile, and you want it to remain that way. Lay the bag down flat on the table where the outlet port can't touch anything.
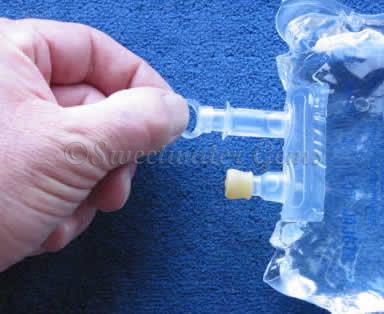
Now pick up the "spike" end of the IV set. It will have a plastic cap that covers it. Remove the cover to expose the spike. Do not touch the spike with your fingers or let the spike touch the table or anything else. It's sterile, and you want it to remain that way....
Now shove the spike into the outlet port opening..
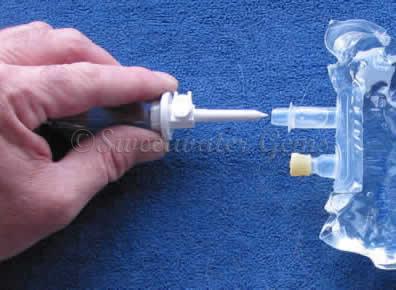
You will need to use a firm pressure and it helps to rotate the spike back and forth some as you push it into the opening. Push it all the way in as far as it will go.
Now
set the bag down and pick up the other end of the IV hose. It will also
have a small plastic cap on it to keep the end clean and sterile. The
cap will probably be held on by a small threaded collar. This threaded
collar will hold the needle on once the cap is removed. Grab the collar
in one hand and the cap in the other and twist and remove the cap.
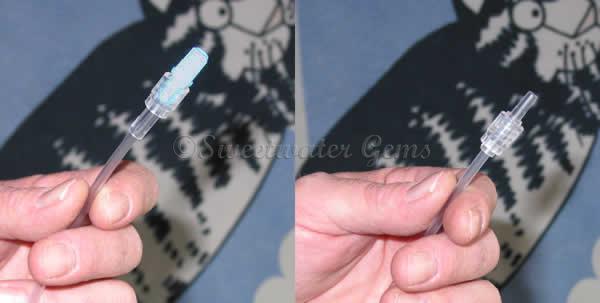
Once again, the end of the hose that's exposed when you remove the cap is supposed to be sterile, so don't let it touch anything, including you. Pick up a needle and pop the blunt end of it through the package. Don't touch the open end of the needle. Sterile, remember?
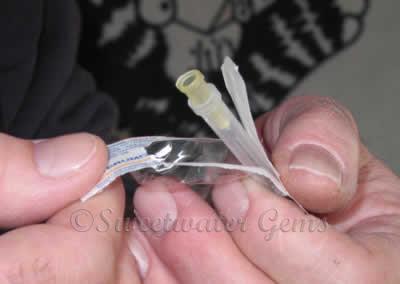
Push the end of the IV set into the open end of the needle. Twist the threaded collar down over the back end of the needle and screw it on snugly so the needle can't fall off or leak. Do NOT remove the protective plastic cover from the pointy end of the needle yet.
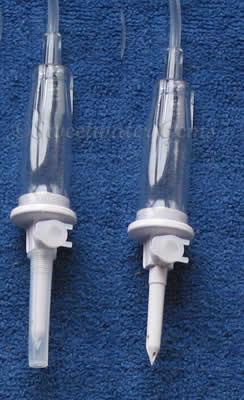
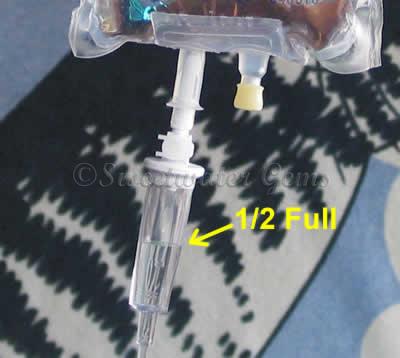
Now hold the bag upright like it was hanging up. Take a look inside the bag. There should be some air space above the fluid in the bag. The air in this space is very important. IF you forgot to close the valve on the IV set before you spiked the bag, it is possible you may have let the air escape from the bag. If this happens and there is not enough air remaining in the bag, then the sides of the bag will stick together as the fluid level goes down and you will NOT be able to read how much fluid is still in the bag. This makes it impossible to tell how much fluid you have put in the cat. If you remembered to close the valve on the IV set before spiking the bag then the air space in the bag should be fine.
Still holding the bag upright, examine the drip chamber. You want it to be about half full of fluid. Give the chamber a little squeeze to force some of the air out of it and up into the bag. Release the chamber and let it suck some fluid in. Repeat until the chamber is about half full. If it gets too full, then turn the bag upside down so the drip chamber is on top and squeeze the drip chamber to force some of the fluid back down into the bag and let some of the air from the bag go back into the drip chamber. The amount of fluid in the drip chamber is not that critical, but If it's not full enough air bubbles may end up going down the IV hose when administering fluids. If a few small air bubbles under the skin it shouldn't hurt anything, but try and keep it to a minimum. If the drip chamber is too full, you won't be able to see the drip and won't have any idea of how fast the fluid is flowing. About 1/2 full is real nice.
So, now the hardware is assembled, and it's almost ready to use.
Now we come to something that I think is EXTREMELY important in reducing a cats discomfort during sub-Q... warming the fluids.
Warming the fluid The idea here is to warm up the bag of fluid so that it is close to the normal cat body temperature of approximately 102° F. It only makes good sense. If you put 100mL of fluid into a 10 lb cat, that's the equivalent of putting 2 liters (over 1/2 gallon) of fluid under the skin of a 200 lb guy like me! It's a LOT of liquid to put under the skin, and if it's cold it is going to be VERY uncomfortable. Most cats don't like to be cold, and CRF cats in particular often feel cold a lot of the time anyway. Warming the fluid up so that it's a nice comfortable body temperature just makes good sense. Sophia is VERY particular about the temperature of her fluids, and she tends to like it pretty warm. If it's even a couple degrees too cool then she growls and complains and lets me know that I've not done it right.
There are lots of ways people warm the fluid bag, but most of them involve immersing the bag in hot water until it is the right temperature. When immersing the bag, you don't want to immerse the bottom end of the bag where the IV set connects to it. Theoretically the connection where the spike goes into the bag is watertight, but IF it were to have a tiny leak then it MIGHT allow unsterile water to enter the bag. Also you definitely don't want to immerse the needle end of the IV set or get the needle wet. Some folks put the entire fluid bag and IV set into a 1 gallon ziplock bag and then immerse the bag into a tub or sink full of warm water. I warm Sophias fluids in a small insulated "picnic cooler".
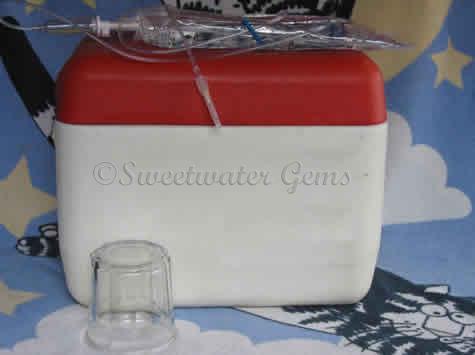
I fill the cooler about 1/2 full of hot tap water. Then I set a short, wide glass in one end of the cooler. I lay the fluid bag inside the cooler, so the end with the IV set is on the glass and supported above the water. I put the lid on the cooler with the needle end of the IV set dangling out from under the lid so it stays dry. It usually takes between 10 and 20 minutes to get the bag up to temperature depending on how full the bag is and what its starting temperature is. Summer takes a little less time, winter takes a little more.
Whatever you do, please don't try warming the fluids in the microwave oven. Not a good idea...
When I think the bag is probably up to temperature, I lift it out of it's bath and slosh it around just a bit to make sure the contents are mixed so there's no hot or cold pockets in the bag and then I "shoot the bag " with an Infrared thermometer. The thermometer is a nifty device - you simply point at the bag and push a button and it instantly reads the surface temperature on a digital display. There are many brands and types of IR thermometers, but I use an inexpensive Radio Shack model. It normally retails for about $50, but I bought mine on sale for $30. The Radio Shack catalog number for the thermometer we use is 22-325.
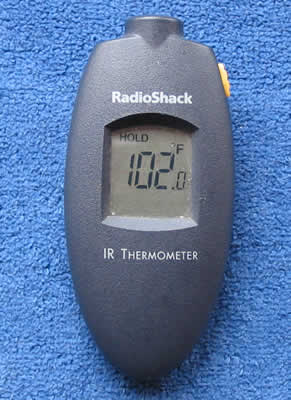
It just takes a second to take the bags temperature. If it's still too cool then I drop it back into the hot water bath to heat up some more. If the weather is cold and the fluid bag is new (full) then I may add some more hot water as well. If the thermometer says the bag is too hot, then I pull it out and let it cool or sometimes run a little cool tap water over it for a few seconds to cool it off. Slosh the bag around a little to mix the fluid and equalize the temperature. When the IR thermometer says the temperature is about right, then I lay the bag across my wrist and let it lay there for a few seconds. It should be nice and comfortably warm. That's the second test that the temperature is right and that it will be safe and comfortable for Soph. The thermometer and the wrist work as a reality check against each other to make sure it's ok.
The exact temperature to heat the fluids depends on your cat... apparently some cats don't like the fluid very warm. Sophia like hers right around body temperature and complains if it's too low. In the summer when it's HOT out, I may shoot just a little low, maybe around 98-100°F. In the winter I aim for just a few degrees above body temperature, maybe as high as 105°F. On a cold day the fluid will cool off a couple degrees as it travels down the IV hose. I never start the IV if the fluid is hotter than 105°F. I do NOT want to scald my sweet fuzzy girl.
Once the bag is a nice comfortable temperature, I hang it up in it's spot and then it's "show time". All we need now is a cat.
I'm very fortunate to have a wonderful partner in crime, Laura, who helps me give Sophia her sub-Q. I hold Sophia and do the needle work, and Laura opens the valve on the IV set and watches the bag and tells us how far along we are and shuts the valve off when we are done. She also provides casual conversation and doubles as photographer on the sub-Q action shots. The kitties and I all love Laura. :-)
So... the hardware is all assembled and the fluid is warm. It's time to go get a cat. Ahhh... here's one now..
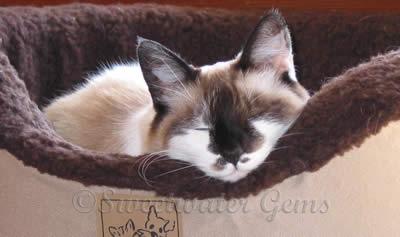
Sophia knows what's happening. She knows what time it is. She hears me fill the cooler with hot water in the bathtub, and hears me call to Laura when the bag is warm and ready. She knows exactly what's going on and what comes next, but she's always good and is almost always waiting in her bed when it's sub-Q time. I go pluck her out of her bed and carry her across the hall to our spot. I set her down on the table and she just lays down down and waits. I remove the protective cap from the needle and hold the needle over the "spew jar" for a second and Laura opens the valve and lets some fluid flow through the line and in to the jar. The reason for this is to let some warm fluid from the bag flush out the cold fluid in the IV line. (The fluid in the thin line cools very quickly after I hang the bag and go fetch the cat)

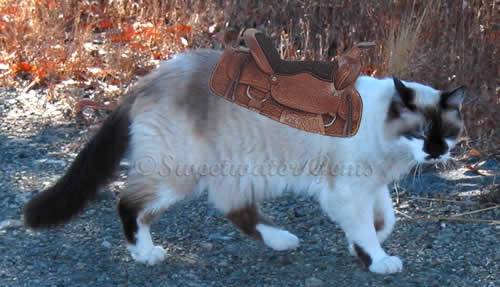
I try and stick Sophia in a different spot every day to minimize scarring in one area. If you picture your cat as a little horse with a saddle, anywhere in the "saddle area" where the saddle would cover is acceptable to insert the needle.
Next I massage a little area on Sophias back and choose my spot. I lift up the skin in that area to form a little skin "tent", and I insert the needle at the back of the tent with the open side of the needle facing upwards, so that when it's inserted the open end is facing the skin and not the body.
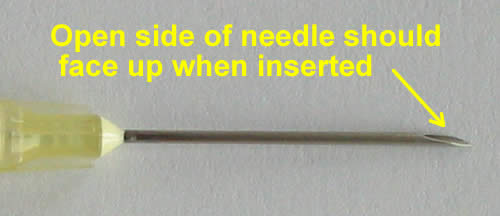
The needle should be inserted fairly parallel with the spine, and not angled downward too far. You want the needle to go under the skin, but it should NOT hit muscle.
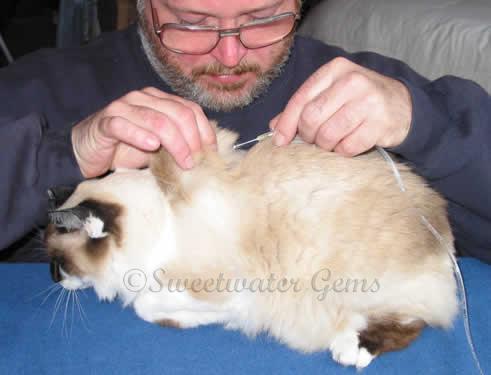
When the needle is in I signal Laura that it's time and she opens the valve on the IV set and off we go....
Sometimes when the valve is opened, the juice will flow kind of slow. One reason this can happen is because the IV tubing gets flattened out where the clamp pinched it shut. It helps if when you open the clamp you slide it up or down a couple inches and "massage" the tubing where the clamp was to make it round and open it up again. The other reason that the fluid can flow too slowly sometimes is because of the needle position in the cat. Sometimes gently rotating the needle, or pulling it back just a tiny bit, or gently pulling up on the skin in the area will unblock it and get the flow going again.
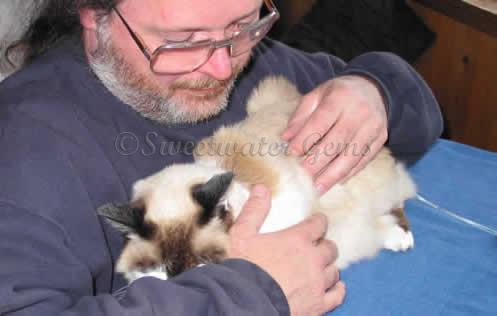
Once the needle is in and the fluid is flowing, it's just a waiting game. I pet Sophia and tell her what a good girl she is, and Laura and I engage in small talk. It's just a casual "hanging around the water cooler at break time" attitude for the next 2 minutes. Sophia just lies still and waits while we do what needs to be done. We're very fortunate that she's always calm and good during sub-Q so we can just relax and talk or meditate on the meaning of cats while the juice flows.
Once in a very great while, when Laura turns on the valve, fluid will start to run down the side of the cat...
This usually means that the needle has been pushed too far in and and has poked out the other side of the "tent". I simply slide the needle back out *just a little bit* so the end is back inside of the cat and I apologize to her and carry on. Ooops... sorry Soph, it happens sometimes. She knows I'm not a cat, and doesn't expect me to be perfect. Excuse me... I mean purrfect.
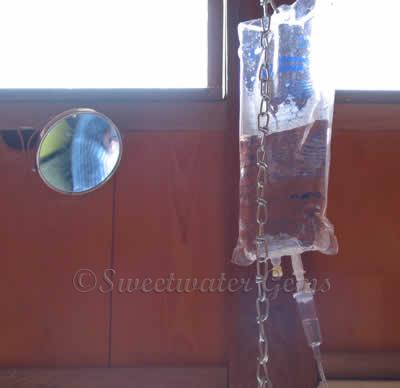
Sometimes Laura can't be around to help when we do our sub-Q. Since Sophia is so good, it isn't hard for me to do it alone. The biggest problem is that the bag is nearly overhead and I can't see the fluid level. When Soph and I have to do the fluids alone, first I take a short piece of black electrical tape and place it on the bag so that the top edge is at the level the fluid should be at when we are at the end of our session. I have a small round mirror that I hang on the wall at about the same height as the bag. The mirror is carefully adjusted so that I can look straight up and see the side of the bag in the mirror. When the fluid level in the bag gets down to the level of the tape, then I know we are done. It's not a good idea to mark directly on the bag with a pen because some of the volatile components of the ink could possibly leach through the plastic and contaminate the fluid.
Hey look, it's been about 2 minutes already and we've got our daily dose of fluid in! Laura shuts off the valve and I slip the needle out and tell Sophia how very good she is and set her on the floor. I never let her jump down on her own. I'm in charge of this session and we play by MY rules until I put her back on the floor. I set her down, and she goes and scratches her claws on her scratching mat. (Maybe thinking what she'd like to do to me) I put the plastic cover back on the needle so no one gets stuck.
Sometimes a little fluid may leak out of the cat where the needle came out. Just pinch the area gently between your fingers for a minute and it should stop. Once in a while you may nick a blood vessel in the skin when the needle goes in, and when you pull it out a little blood may leak out of the hole. Don't freak out, this is no big deal. Even if it LOOKS like a lot of blood, it's probably just a 1/2 a drop of blood mixed with several drops of sub-Q fluid and it looks like way more than it is. Just pinch the skin for a minute and it should stop.
The fluid will usually end up in a "pouch" under the skin. This fluid pouch may slide around under the skin, and it may even slide down a front leg. This is normal, and it usually doesn't cause any discomfort. If your cat does exhibit some discomfort, try injecting the fluid a little farther back next time. The fluid is more likely to end up as saddle bags around the middle instead of sliding down a front leg. Remember anywhere in the "saddle area" is ok to use.
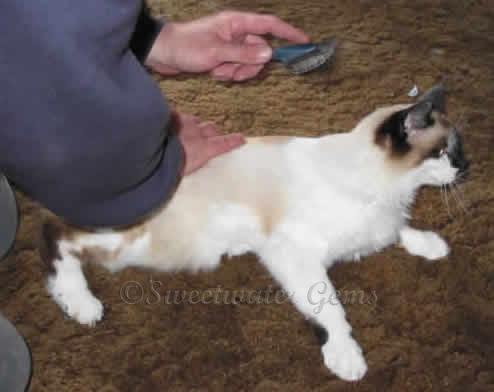
When we're all done then Soph and I both trot across the hall and I give her a reward... a few minutes with the brush. She loves to be brushed, and it's a nice way to end our session. Usually after a minute or 2 under the brush she decides she's hungry and heads off to eat a few crunchies. There's never any hard feelings between us when we're done with our sub-Q and she's always friendly to me when it's over.
After our brushing I go remove the old needle from the IV set and purge just a little fluid through the line into the spew jar, then I put a fresh needle on so it's ready to go for the next night. When removing the old needle, it comes off easier if you twist the needle back and forth a little as you pull it off. Make sure to put the plastic cap back on the needle first. It will make it easier to get a grip on the needle to remove it, and it will keep you from stabbing yourself with the needle!
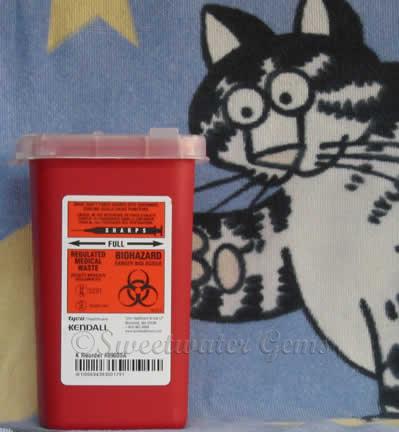
Used needles are "medical waste" and should be disposed of properly. We ordered a "Sharps" container when we ordered our fluids and supplies. They only cost a few dollars. When it's full I take it to our Vet for disposal and order a new container.
Hey, we're all done and free to go about our regular cat business!
One of the problems with having to give meds and fluids everyday is that it becomes difficult to get away for vacation. Some people hire a Vet tech to come give meds and fluids daily, but that's not very practical for us and can get a bit expensive as well. And I would worry about her anyway...
After much thought, we decided to pack up Sophia and all her meds and take her on vacation for a few days with us. It worked out wonderfully. We had a great time and we were able to give Sophia her meds easily at our campsite and didn't have to worry about how she was doing at home without us.
Read about Sophia's Camping Adventure.
Helpful Resources for CRF kitties and their humans.
Cats and their people develop different "styles" of giving sub-Q. The basics are usually the same but everyone has their own variations and methods that seem to work best for them. You can find links to other peoples stories of how they do it, plus other good info about sub-Q's at these sites:
http://www.felinecrf.org/giving_sub-qs_giving_set.htm
http://www.felinecrf.com/links0.htm#3
For a wealth of good information about CRF and it's treatment, I highly recommend these sites:
A Yahoo users group with over 4000 members who are fighting the CRF battle. A lot of wisdom and support can be found here:
http://groups.yahoo.com/group/Feline-CRF-Support/
Sometimes cats
don't want to eat and they need some help to keep them going until they
get back on their feet a little.
Here's a great
group for learning how to Assist Feed your kitty:
http://pets.groups.yahoo.com/group/Feline-Assisted-Feeding/
Constipation can be a common problem for CRF kitties. Here's an EXCELLENT site that explains how the feline gut works and how to help keep it working smoothly, and about the causes, prevention, and treatment of feline constipation:
http://www.felineconstipation.org/
Cats with CRF quite often have other problems caused by the disease. These excellent Yahoo groups address a few of these problems:
http://groups.yahoo.com/group/Feline_Anemia/
http://groups.yahoo.com/group/Feline-Phosphorus-Management/
http://groups.yahoo.com/group/Calcitriol/
A great list of places to get supplies for reasonable prices, along with information about ACE inhibitors and Calcitriol can be found at David Jacobson's web pages:
http://members.verizon.net/~vze2r6qt/
We buy our fluids, needles, and IV sets at BRICO Medical. We like their service and prices:
http://www.bricomedicalsupplies.com/CRFpage.html
Taking care of a terminally ill pet can be very expensive and a serious financial hardship. No one's beloved companion should have to suffer or be euthanised simply because it's owner can't afford treatment. IMOM provides help for pets and their owners in need. If you are in need of financial assistance to help your pet, you should contact them to see if you qualify for assistance.
IMOM relies on the generosity of donors. If you would like to become an IMOM donor or sponsor, PLEASE contact them to find out how you can help. A few dollars a month can make a big difference.
Hosting for this
site is provided by Steve & Laura at www.SweetwaterGems.com
. Please visit us!
You can find links to Sophias pages and also meet our current cats at
our cats page. www.SweetwaterGems.com/cats
© 2004- 2008 www.weirdstuffwemake.com All rights reserved